Do you want to create a client portal in WordPress?
A client portal allows you to create a dedicated area for clients where they can login to access documents, files, support, and more.
In this article, we’ll show you how to easily create a client portal in WordPress.

Why and Who Needs a Client Portal in WordPress?
A client portal allows you to efficiently manage client resources online. This reduces support requests, allows clients to help themselves, and provides them a better user experience.
For instance, if you run a photography website, then your clients can download or upload files via their client dashboard.
Similarly, if you run a graphic design or web design agency, then you can use a customer portal where clients can access all the files and information they need.
Any business that needs to communicate with clients online can benefit from creating a client portal in WordPress.
How to Create a Client Portal in WordPress
Each business has different requirements for its client portal. This is why you need a solution that is flexible, works with other WordPress plugins, and can be easily extended to match your business.
For this tutorial, we will be using MemberPress. It is the best WordPress membership plugin on the market and allows you to easily create members only content, create an account page, login, and registration forms, and more.
It comes with powerful display rules, full membership management, and the ability to create different levels of membership plans.
First, you need to install and activate the MemberPress plugin. For more details, see our step by step guide on how to install a WordPress plugin.
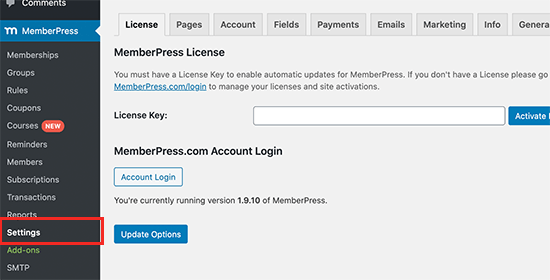
Upon activation, you need to visit MemberPress » Settings page to enter your license key. You can find this information under your account on the MemberPress website.
Next, you need to switch to the ‘Payments’ tab and select a payment method to accept payments for membership subscriptions. You can also create free subscription plans if you want or manually add members by yourself.
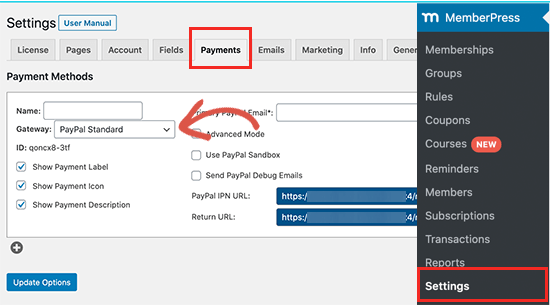
MemberPress supports PayPal and Stripe. You can also use Authorize.net with their Plus and Pro plans.
After selecting your payment method, you’ll be asked to provide your account details. Once finished, click on the ‘Update Options’ button to save your changes.
Next, you are ready to create a membership plan. This is the subscription plan that you’ll add your clients to.
Simply go to the MemberPress » Memberships page and click on the Add New button.
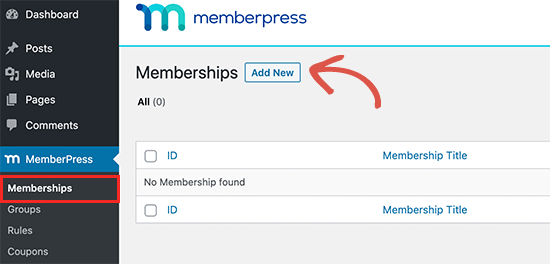
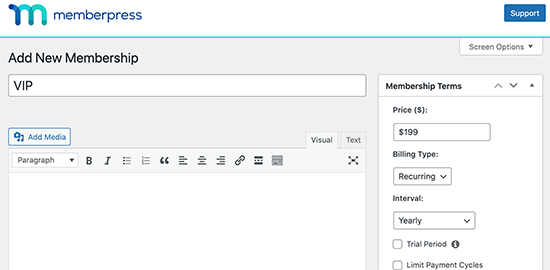
On the next screen, you can give your membership plan a name and set a pricing option. Depending on how you manage your client-contracts, you can choose lifetime, expiring, or fixed expiring plans.
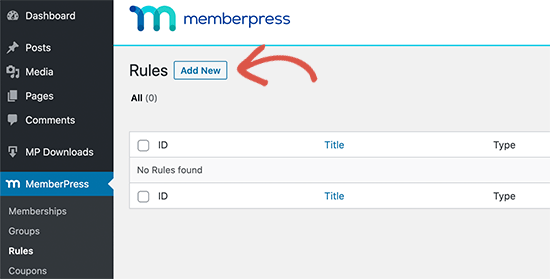
Next, you need to create access rules. This allows you to control which parts of your website you want to be protected and available to members-only.
Simply, go to the MemberPress » Rules page and click on the Add New button at the top.
On the next screen, first you need to choose which content you want to restrict under ‘Protected Content’.
MemberPress offers a whole range of options. You can select posts that match certain tags, categories, pages that are under the same parent page, single posts, or any URL.
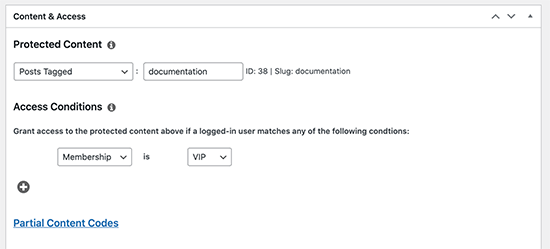
For instance, if you use a WordPress knowledge base plugin to manage documentation for clients, then you can restrict those articles to the membership plan. Similarly, you can also restrict any post, page, category, or tag to clients only.
Below that, you need to select who will have access to the protected content. We have chosen the membership plan we created earlier for our clients.
After you have added the access rules, click on the Save Rule button to store your settings.
Creating a Client Account Page in MemberPress
MemberPress allows you to easily create and manage an Account page. This is the page your clients will see when they login to their client account.
First, go to MemberPress » Settings page and switch to the ‘Pages’ tab. From here you can select the page you want to use as the account page.
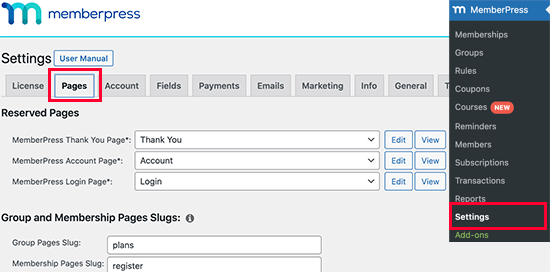
By default, MemberPress creates and uses the ‘Account’ page. You can use a different page if you want. After that, simply click on the Edit button to open the page and edit it.
You can edit the page just like you would edit any WordPress page. Any content you add here will be visible to everyone and not just your client.
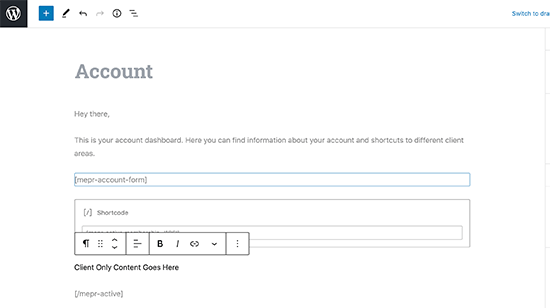
However, you can add custom text here and use the ‘[mepr-account-form]’ shortcode to display the login form anywhere you want.
Customizing Client Account Page in MemberPress
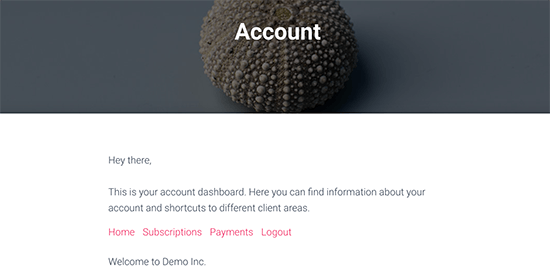
One way to customize the account page in MemberPress is by simply editing it. However, any changes you add here will be visible to everyone and not just your clients.
To add content that is only visible to your clients, you can hide it using MemberPress shortcodes.
For instance, if you only want to show some content to the clients under the VIP membership plan, then you will wrap your content like this:
[mepr-active membership='186']

Client only content goes here

[/mepr-active]
Don’t forget to replace 186 with your own membership ID. You can view membership ID for any plans by visiting MemberPress » Memberships page.
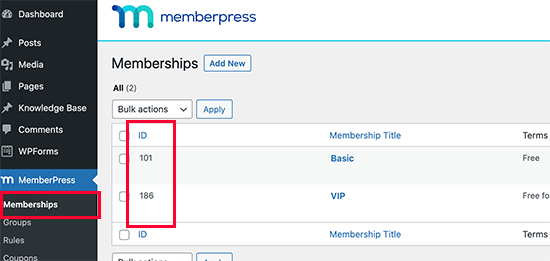
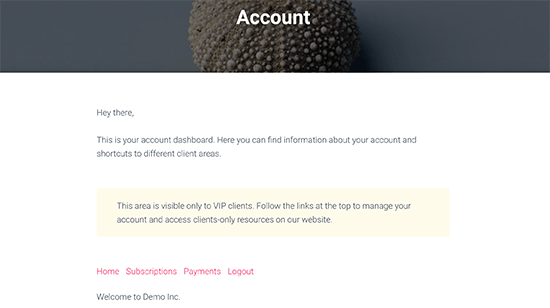
Save the changes you made to the Account page and visit your website to see it in action. You’ll need to login with an account with access to the membership plan you created earlier.
Adding Tabs to The Accounts Page in MemberPress
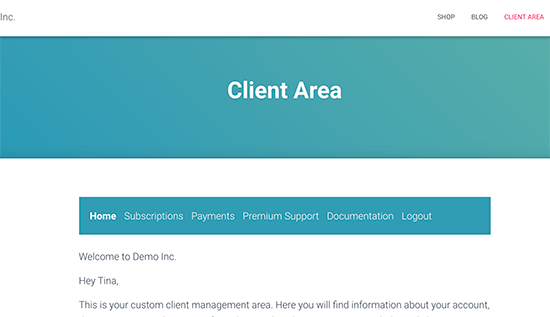
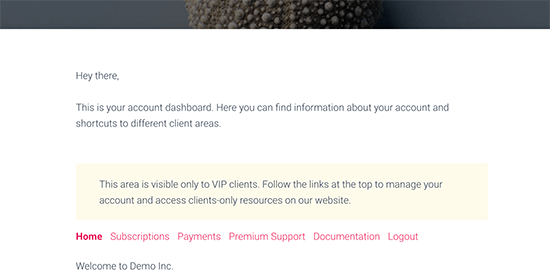
By default, MemberPress will show Home, Subscriptions, Payments, and Logout tabs. If you are comfortable with adding custom code, then you can customize this to add more tabs and show more client-focused content there.
Let’s add a tab with a contact form and another one to list documents clients can access from their dashboard.
Simply add the following code to your theme’s functions.php file or a site-specific plugin.
function mepr_add_some_tabs($user) {
  $support_active = (isset($_GET['action']) && $_GET['action'] == 'premium-support')?'mepr-active-nav-tab':'';
  ?>
    <span class="mepr-nav-item premium-support <?php echo $support_active; ?>">
      <a href="/test4/account/?action=premium-support">Premium Support</a>
    </span>
  <?php
  $documentation_active = (isset($_GET['action']) && $_GET['action'] == 'documentation')?'mepr-active-nav-tab':'';
  ?>
    <span class="mepr-nav-item premium-support <?php echo $documentation_active; ?>">
      <a href="/test4/account/?action=documentation">Documentation</a>
    </span>
  <?php
}
add_action('mepr_account_nav', 'mepr_add_some_tabs');

function mepr_add_tabs_content($action) {
  if($action == 'premium-support'): //Update this 'premium-support' to match what you put above (?action=premium-support)
  ?>
    <div id="custom-support-form">
      // your contact form shortcode here
<?php echo do_shortcode(''); ?>
    </div>

  <?php
  endif;
  if($action == 'documentation'): ?>
  <div id="documentation">
  // shortcode provided by your knowledge base plugin to list articles or manually add content here
<?php echo do_shortcode(' [knowledgebase] '); ?>

  </div>
<?php
 endif;
}
add_action('mepr_account_nav_content', 'mepr_add_tabs_content');
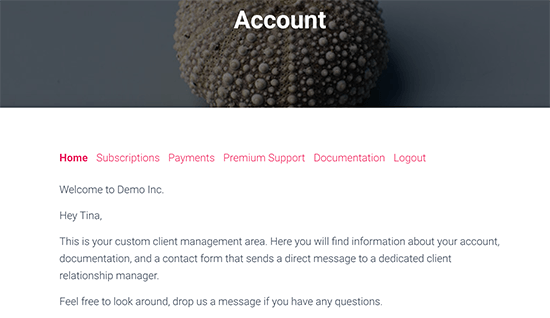
As you can see we created two tabs, one to display our contact form created with WPForms and the other one to display our knowledge base articles.
We used shortcodes provided by both these plugins inside the code. However, you can also manually add any other content you want here.
Don’t forget to save your changes and preview your account page. This is how it looked on our demo website:
Adding Custom Content for an Individual Client
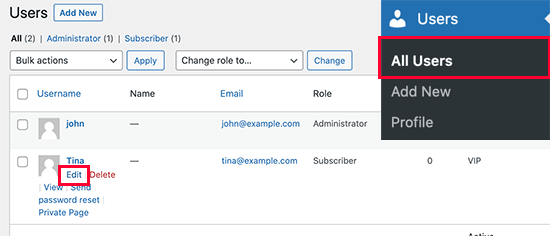
MemberPress also allows you to manually modify the Account page for individual members and clients. Simply go to Users » All Users page and click on the ‘Edit’ link below the user you want to change.
Scroll down to the ‘Custom MemberPress Account Message’ and add the content you want to show to that specific client.
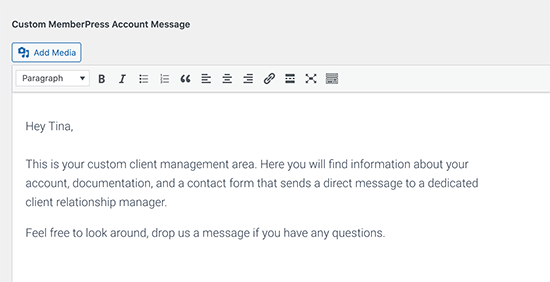
This area works like a regular WYSIWYG editor with formating toolbar at the top. You can also add images, links, shortcodes, galleries, videos, audio, and more.
Don’t forget to click on the ‘Update User’ button to save your changes.
Adding a Link to Client Area using MemberPress
Now that you’ve created and customized the client area. It is time to make it easily accessible for your clients.
Simply go to the Appearance » Menus page and add the Account page you created earlier to your navigation menu.
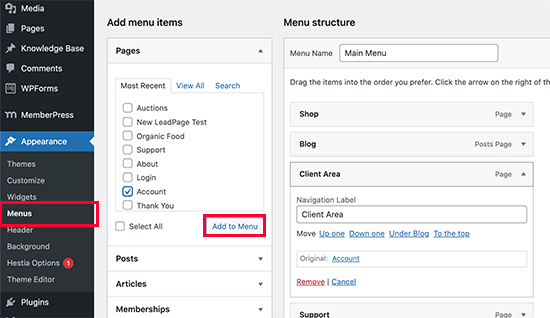
You can click on the menu item to change its title. For instance, here we changed it to Client Area.
Don’t forget to click on the Save Menu button to store your settings. You can now visit your website to see your client area in action.

Clicking on the link will take users to the account page where they can access client shortcuts after log in.
Extending Client Portal with MemberPress
MemberPress is an extremely powerful and highly flexible platform to build your client portal in WordPress.
It allows you to not only easily restrict access to clients only resources. It also helps you easily add any features you want to your client portal.
1. File Downloads
Want to allow your clients to easily download files from your website? MemberPress comes with a File Downloads addon that helps you manage clients only downloads easily.
![]()
For step by step details, see our guide on how to manage file downloads in WordPress.
2. Add Learning Courses
MemberPress is also the best WordPress LMS plugin on the market. It allows you to easily create online courses and associate them to your membership plans. This gives your customers easy access to learning resources on your website, while also allowing you to easily manage these resources.
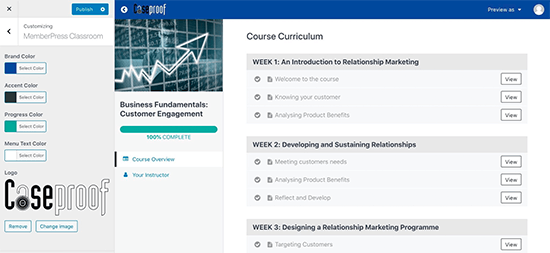
For more details, see our tutorial on how to easily create online courses in WordPress.
3. Add Forms to Clients Area
MemberPress works with WPForms which is the easiest WordPress form builder plugin available.
This allows you to create feedback forms, testimonial forms, run customers surveys, or add support request forms.
Need clients to be able to upload files as well? WPForms allows you easily create file upload forms on your website. You can then embed this form on the account page, or any members-only page on your website.
4. Collect Payments and Upsell Products
As a business owner, you may want to promote other products and services to your existing and past customers.
Using MemberPress as your client portal allows you to integrate with the best email marketing services. This enables you to stay in touch with customers more efficiently and promote other products and services.
MemberPress also works with all popular payment gateways like Stripe and PayPal. This way you can easily collect payments for other services by selling them as a membership plan.
Alternately, you can also add an online store using WooCommerce and sell any products you want on the same website.
We hope this article helped you learn how to create a client portal in WordPress. You may also want to see our comparison of the best business phone services for small business, and best chatbot software to offer better support.
If you liked this article, then please subscribe to our YouTube Channel for WordPress video tutorials. You can also find us on Twitter and Facebook.
Source: WPBeginner

